How to Add Google AdSense in Angular to Make Passive Income Online
I was able to integrate Google AdSense into my Angular Progressive Web Application (PWA) and Single-Page Application (SPA) successfully and started earning money online through website monetization. I can show you how


Sign up for Google AdSense
The first thing you have to do is to create an AdSense Account using your Google Account. You can do so by visiting the AdSense homepage to get started: https://www.google.com/adsense/start/.
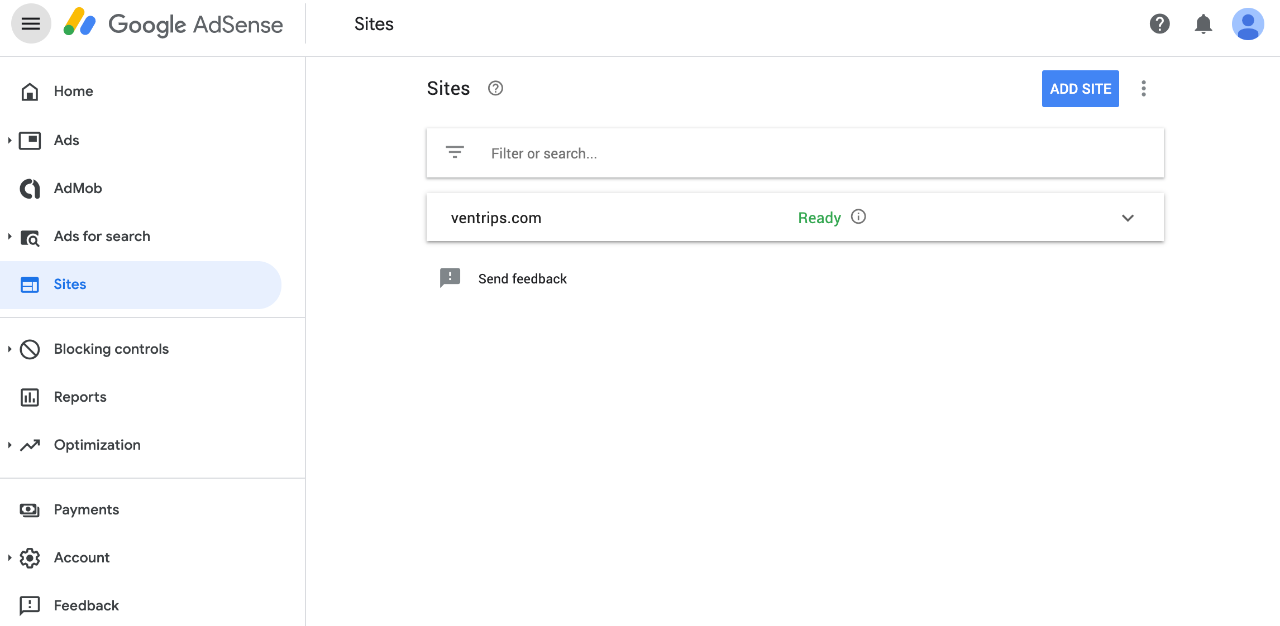
Enter your Website URL that you want to display Ads on
Once you have an AdSense Account, you can add the URL of your site on the Sites tab.
Connect your Website to your AdSense
After adding your website URL, you will be taken to a screen where it provides you a code snippet containing your Google Ad Client ID. This typically starts with "ca-pub-XXXXXXXXXX"
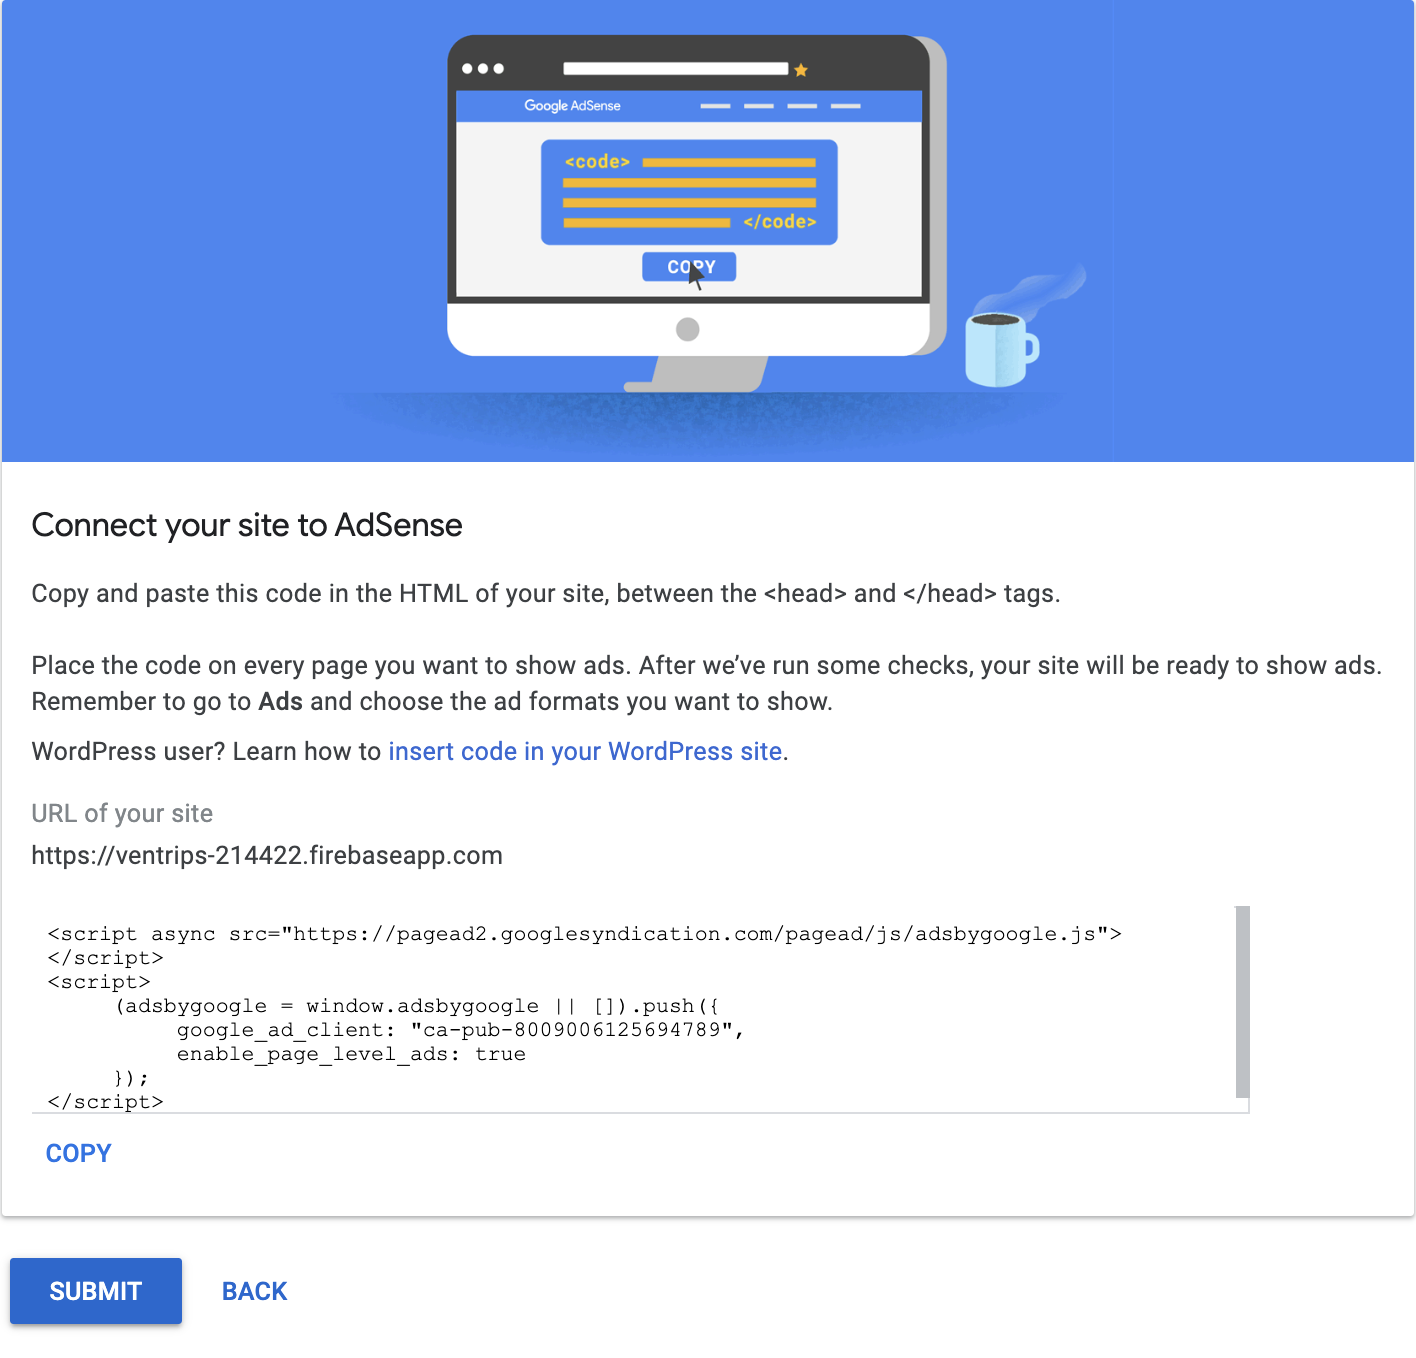
The instructions suggests that we copy and paste the above code snippet onto the HTML of our site. Since we have an Angular application, we will be integrating Google Adsense a bit differently.
You will only need to copy and paste the AdSense script:
<script async src="https://pagead2.googlesyndication.com/pagead/js/adsbygoogle.js"></script>
in your index.html, between the <head> and </head> tags.
<!DOCTYPE html>
<meta http-equiv="X-UA-Compatible" content="IE=edge" />
<html lang="en">
  <head>
    <meta charset="utf-8">
    <title>Ventrips</title>
    <base href="/">
    <meta name="viewport" content="width=device-width, initial-scale=1">
    <link rel="icon" type="image/x-icon" href="favicon.ico">
    <link rel="apple-touch-icon" sizes="192x192" href="assets/icons/apple-touch-icon.png">
    <script async src="https://pagead2.googlesyndication.com/pagead/js/adsbygoogle.js"></script>
  </head>
...
As for the other script snippet, just copy or note down your Google Ad Client ID ("ca-pub-XXXXXXXXXX") somewhere. We will be using this later in the next following steps.
ng2-adsense: Easy AdSense for Angular Applications
For my Angular application, I used an open-source library, called ng2-adsense, that handles the integration and makes AdSense easily configurable. The link to the library and documentation can be found here: https://github.com/scttcper/ng2-adsense.
You can also see a demo of the ng2-adsense in action: https://ng2-adsense.xmplaylist.com/#/
All credit goes to the author & contributor, Scott Cooper (scttcper), for creating an awesome light-weight AdSense library for Angular applications!
This node module has everything you need to get AdSense added in minutes so you don't need to create anything from scratch. Scott also provides regular updates to stay compatible with future Angular versions.
You can follow the ng2-adsense documentation to get things imported and configured if you want. But I will tell you the steps I personally took in case you want another perspective and alternative approach.
Install ng2-adsense on your favorite terminal
npm install ng2-adsense
Import AdsenseModule on top of your app.module.ts
import { AdsenseModule } from 'ng2-adsense';
Add AdsenseModule.forRoot() to the imports section of your NgModule in app.module.ts
@NgModule({
  declarations: [
    AppComponent
   ],
   imports: [
    AdsenseModule.forRoot()
...
Add <ng-adsense> tag to any component.html you want to display ads on
<ng-adsense [adClient]="'ca-pub-XXXXXXXXXX'" [pageLevelAds]="true"></ng-adsense>
The ng-adsense library offers many different configuration options that you can choose. Make sure you take a look at the documentation to see what each of them does so you can take full advantage of its features.
Remember your Google Ad Client ID ("ca-pub-XXXXXXXXXX")...? Well now is the time to use it!
You may wish to set your Google Ad Client ID in your AdsenseModule.forRoot() as a global default (see ng2-adsense documentation), or you can set [adClient] with the Google AD Client ID in the <ng-adsense> tag like I did.
I chose this way because I could have multiple Google Ad Client IDs that I would like to use in the future.
There are many different types of Ad layouts you can choose from (check out your AdSense Account page to view all the different options), but if you want a simple Page Level Ad (which includes Anchor/overlay Ads & Vignette Ads) for mobile, you can just set [pageLevelAds] to true on your <ng-adsense> tag.
Deploy your Angular Application
Now is the time to save, commit, and deploy these code changes to your site! Google AdSense will need to verify that your site is connected to AdSense.
Eligibility Requirements for AdSense
In addition to verifying that your site is connected to AdSense, Google will also need to check that your site meets their eligibility requirements. Your site basically needs to have original content, comply to their Program Policies, and that you are at least 18 years old.
You can read more about their requirements here: https://support.google.com/adsense/answer/9724?hl=en
Note: Your Angular Application might need to be SEO-supported in order for Google's bot to crawl through and see if you have original content. This may mean using Angular Universal for server-side rendering. You can learn more from my previous post here
The Final Step: AdSense Approval
At this point, your Angular application should be fully integrated with Google AdSense. If your AdSense Account status is Ready, you should be able to see your Ad placements right away! If you have any Ad Block extensions enabled on your browser, make sure you turn them off.
Waiting for AdSense approval can be the longest step in the process, so you have to make sure you meet their guidelines to not waste time requesting for approval. It took me two weeks to finally get my website approved.
Best of luck!!! 🍀🙏😎
You May Also Like

Subscribe to Newsletter
Get the latest posts delivered to your inbox